Black Raspberry Jam Tea Cakes

It has been a fairly mild winter in New England, so mild that I can count the number of times I’ve needed to turn on my heat on one hand. It also helps that I’ve been in a bit of a baking frenzy, and somehow managed to turn a small corner of my kitchen into my office.

All it really takes is a spark of curiosity, and before I know it I’m buried in a new cookbook with a notebook and pen in hand and my laptop less than an arm’s length away. And sometimes my experiments work out well, like these mini cakes — a perfect treat for a mid-morning coffee break.

Mini Black Raspberry Jam Tea Cakes

Adapted From: The Best Quick Breads by Beth Hensperger
Makes: 8 mini loaves, or 12 muffins
Oven: 350 degrees
Baking time: Approximately 20 minutes

Ingredients:
1 1/2 cup unbleached all-purpose flour
1/2 cup sugar
1 tsp baking powder
1/2 tsp baking soda
pinch salt
2 large eggs
1/2 cup buttermilk
1 1/2 tsp almond extract
4 tbsp unsalted butter, melted
1/2 – 2/3 cup black raspberry jam, preferably with seeds
1/4 cup powdered sugar

Directions:
Preheat your oven to 350 degrees. Grease and flour your mini loaf pan, or muffin tin.

In a mixing bowl, combine the flour, sugar, baking powder, baking soda, and salt. In a separate bowl, whisk together eggs, buttermilk, almond extract, and butter. Carefully add this mixture to the dry ingredients and beat until the batter becomes smooth and fluffy.

Spoon the batter evenly into the prepared pan. Cover each loaf, or muffin, with spoonfuls of the jam, dotting it over the surface of the batter. Insert a butter knife straight into the batter and gently swirl a few times to distribute the jam slightly through the batter.

Bake in the center of the oven until a cake tester inserted into the cakes comes out clean, about 20 min. Rotate your pan halfway through.

Let the cakes cool for 10 minutes. Carefully remove the cakes and place them on a cooling rack. Sift the powder sugar over the top of the cakes.

The cakes can — and should — be served immediately.

Additional notes:
Because I had some extra buttermilk to use up, and the first batch went so well, I decided to make a second batch using some chocolate hazelnut spread I had hanging out in my cupboard. While this was a little bit more difficult to distribute through the cakes, the flavor was exactly what I had been looking for — warm, chocolatey, and not too sweet.

What jam, or other spread, flavor do you want to try in this recipe?

I Bake, You Bid!

… And together we help end cancer! Okay, okay — maybe that was a little cheesy, but it’s all for a great cause. My friend Amanda, over at Tales from a Kitchen Misfit, is training to run the Boston Marathon to benefit The Leukemia and Lymphoma Society with Team in Training.

You see, bloggers — especially food bloggers — tend to do things a little bit differently in general and this is no different. Amanda has decided that the best way to bring us together, satisfy some sweet tooths (teeth?), and raise some money all at the same time is by putting together a virtual bake sale featuring goodies from some of her (and my) favorite bloggers out there. And what a bake sale it is: Salted Chocolate Chip Cookies, Cinnamon Apple Peanut Butter, Double Chocolate Velvet Cake, Fudgy Brownies with a Swirl, and my own — now award-winning (seriously!) — Pear Bread with Vanilla and Ginger.

So how this works is that you go check out the full list of treats up for grabs, pick your favorite (or favorites), and leave a comment with your bid. Bidding will end on January 28th, at which time Amanda will reach out to the winning bidder and the blogger/baker to coordinate delivery of the goods. Once the winning bidder has made their donation directly on Amanda’s fundraising page, the blogger/baker responsible will whip up a batch of the winning item(s) and send them on their way.

What are you waiting for?! Go get your bid on!

Pear Bread with Vanilla and Ginger

Once upon a time there was a girl who was obsessed with cooking, food, wine, cookbooks, and going out for brunch with her friends. Even though the girl was running out of room on her bookshelves, she knew that there were more books out there to read and new recipes to try. And then one day the girl got the chance of a lifetime — to have brunch with some of her favorite friends while being regaled by tales of cookbook publishing and surrounded by mountains and towers of shiny new cookbooks — at none other than local publishing house, Harvard Common Press.

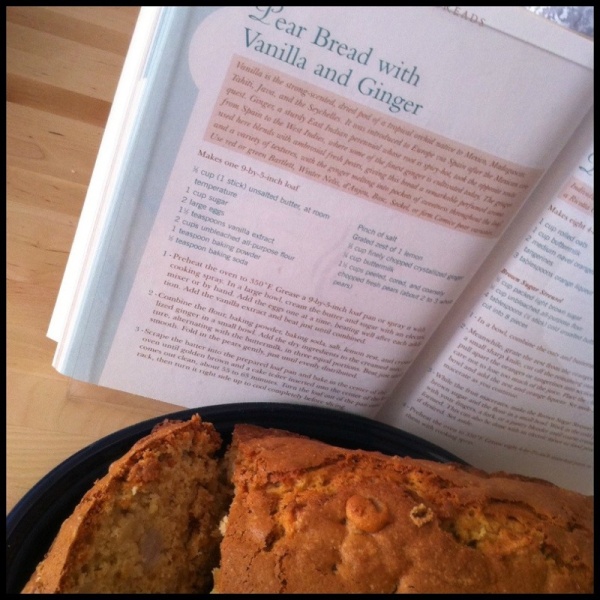
There were delicious cocktails, a savory strata, yummy cakes and breads, and some of the freshest fruit you could imagine — at least in the middle of December. In Boston. With her plate almost piled full of other treats, she spied one last treat she just couldn’t pass up — Pear Bread with Vanilla and Ginger. There was only one piece left, so she (okay — I) moved quick. And a few bites later I was happy that I had saved some room on my plate.

The bread was so delicious and satisfying that morning, I couldn’t wait to find out which book contained the recipe to such a treasure and crossed my fingers that it was in one of the books that were piled in my arms. Unfortunately, it wasn’t. But Bruce Shaw, current president and publisher of Harvard Common Press, wasn’t going to let any of us walk away disappointed and disappeared for a moment. The next thing I knew, I had one more cookbook in my hands — this one containing the recipe for my favorite dish of the entire brunch. And I couldn’t wait to get home, recreate it in my own kitchen, and then share it with you!

Pear Bread with Vanilla and Ginger

From: The Best Quick Breads by Beth Hensperger
Makes: One 9-by-5 inch loaf
Oven: 350 degrees
Baking time: Approximately 1 hour

Ingredients:
1/2 cup unsalted butter, brought to room temperature
1 cup sugar
2 large eggs
1 1/2 tsp vanilla extract
2 cups unbleached all-purpose flour
1 tsp baking powder
1/2 tsp baking soda
1/2 cup crystallized ginger, finely chopped

Grated zest from 1 lemon
Pinch of salt
1/4 cup buttermilk
1 1/2 cups peeled, cored pears, coarsely chopped

Directions:
Make sure the oven rack is set to the center position and preheat the oven to 350 degrees. While the oven is preheating, grease a 9-by-5-inch loaf pan — or spray it with cooking spray.

In a large bowl, cream the butter and sugar together. Add the eggs, one at a time, beating well after each addition. Add the vanilla extract and beat until combined.

In a separate bowl, combine the flour, baking powder, baking soda, ginger, lemon zest, and salt. Add the dry ingredients to the creamed mixture, alternating with the buttermilk, in three equal portions. Beat until smooth.

Gently add in the pears, mixing just until all pieces are evenly distributed.

Scrape the batter into the prepared loaf pan and bake on the center rack until the bread is golden brown and a cake tester, or knife, inserted into the center of the bread comes out clean — about 55 – 65 minutes. Turn the bread out of the pan onto a rack, and then turn it right side up to cool completely before cutting.

Additional Notes:
I am slightly obsessed with my stock of flavored sugars — from vanilla to star of anise. So for this recipe, I was happy to grab my container of vanilla sugar to help bring out that comforting, warming flavor of the bread.

While the combination of the pears, ginger, and vanilla have completely won me over in this bread, I would be lying if I said I wasn’t already thinking about what recipe I am going to try next — Avocado Bread with Pecans and Lime Glaze, Irish Soda Bread, or Black Bean Pancakes!
What is your favorite dining-out dish that you would love to be able to recreate at home?

(More) Additional Notes:
Following a puppy-related disaster with my first batch — in a nutshell, he didn’t like my favorite Fiesta platter as much as I did, but he did give the bread a giant two paws up — I was faced with recreating the bread once again. However, this time I wanted to play with things just a bit.

This time around I focused on the butter. One of the things I picked up from my time at America’s Test Kitchen is that sometimes butter is just better browned — if in doubt, just give their recipe for Perfect Chocolate Chip Cookies a try.

So I grabbed a skillet and let the butter brown before starting on the first step. Just a few moments at the stove resulted in adding a richer flavor and a perfect amount of crisp to the outside of the bread.

It didn’t take long for the pup to start circling the table again, once I pulled this bread out of the oven to cool. So please, do yourself a favor and learn from my mistake — once the bread is cool, wrap it up tightly and store out of reach of any misfit pups in your household. Also, if you do choose to store this in your cupboard, you may want to explore baby-proofing the cupboard doors. Just speaking from personal experience.

Grill-Baked Herb Bread

Never baked bread before? Check. Never operated a gas grill alone before? Check, check. But this bread that Erin posted on Twitter was just too tempting NOT to try.

Her story was that the bread was prepped and ready when she realized her oven was not up to the job, so she improvised and put it on the grill. And it worked! And then she was nice enough to send it to me. Score!

Grill-Baked Herb Bread

Makes: Two 9-by-5-inch loaves
Prep time: Approximately 2 hours*

Cooking time: 30 – 40 minutes

Ingredients:

For the bread dough —

2 tsp yeast

2 1/4 cups warm water

1 tbsp sugar or natural sweetener

1 tbsp olive oil
1 tbsp salt

5 cups bread flour

1 cup whole wheat flour

For the herb mixture —

2 cups parsley, chopped

1/2 cup chives, chopped

1/4 cup thyme, oregano, basil and rosemary, chopped

1/3 cup sesame seeds

1/8 cup poppy seeds or flax seeds

1 tsp black pepper, optional

1 tsp salt

1 egg, beaten OR 1 tbsp olive oil, as a vegan alternative

Directions:
For the bread — 
Combine warm water, sugar, and yeast in a large mixing bowl. Set aside. In another bowl combine flours and salt. Mix well. Let the yeast mixture sit for 10 minutes, then add the olive oil. Slowly add the dry mixture to the yeast mixture until you have a nice dough, making sure it’s not too dry. Knead with a dough hook or by hand. Place dough in an oiled bowl and let it rise until double in size.

Letting the dough rise

While the dough is rising, prepare the herb mixture. Finely chop all herbs and combine them in a bowl with seeds and seasonings. Adding the beaten egg, or olive oil, will help the herb mixture adhere to the bread but it’s not necessary. Stir everything together to evenly distribute flavors.

When the dough is ready to work with, turn it out onto a floured surface. Spread the herb mixture on top of the dough. With a bench scraper, or dough scraper, chop the herb mixture into the dough. Scrape the dough up, fold it over, and chop through it over and over again. Chop until the herb mixture is fully incorporated. This technique might sound bizarre but it creates great swirls and layers in the bread. But be careful not to chop so much that the dough starts to break apart into “marbles”. And make sure to have fun with the mess you are making.

Cutting the herbs into the dough

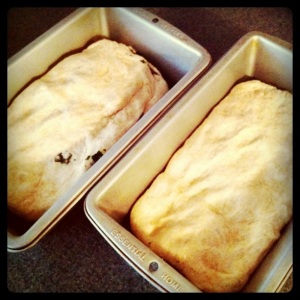
Split the dough evenly in half and form each half into a loaf shape. Place loaves in well oiled 9-inch loaf pans and set aside to rise.

For the grill — 
Preheat the grill to 400 degrees. (Side note – Erin’s gas grill has four burners so after she preheated it she simply turned off the two in the center. This prevented the flames from being directly underneath the pans which would cause the bottom of the bread to burn and allowed her to keep the heat between 350 and 400 degrees by adjusting the two outside burners, while leaving them mostly on low.)

Bake the loaves for 30-40 minutes. (A note from Erin – she suggests using a thermometer to check the internal temp of the bread before taking it off the grill.)

Almost ready!

Additional Notes:
* Regarding the prep time, this is a really rough estimate because a) it was my first bread-making experience and b) I “cheated” and used the quick-rise yeast.

Because I have a habit of forgetting at least one item on my shopping list, I have developed some serious small improvisational skills. For this specific task, I forgot the sesame seeds and flax seeds. But I did have chia seeds handy at home, 2 tbsp to be exact (when combined with moisture they turn a bit gel-like).

I also added 2 tsp of freshly crushed garlic and a sprinkling of a locatelli romano cheese I found last weekend in the North End. I always have to add a little bit of an Italian flair, and those fresh herbs were just begging for it.

And I also can’t stress enough the importance of watching the heat on the grill. I think I was so excited my bread rose at all, I was not paying as close attention to the grill as I should have been. As a result, my loaves were a little “extra crispy” on the bottoms.

Luckily, that was easy to cut off.
And once again, I can’t thank Erin enough for her help – never imagined my first bread-making experience would be this easy!

Vegan Carrot-Apple Bread

When coming up with my first swap contribution, there were a few key elements that I wanted to make sure were involved. I wanted to use seasonal and local produce and keep it as simple and healthy as possible. In this case, it was 3 very brown bananas and some leftover organic carrots and apples.

Fair warning: I kind of made this recipe up on my own based on a basic banana bread recipe. Recreate at your own risk.

Vegan Carrot-Apple Bread

Makes: 6 – 8 mini loaves (3” x 5” foil pans worked well)
Oven: 350 degrees
Cooking time: Approximately 40 minutes

Ingredients:
1/4 cup vegetable oil
2/3 cup unsweetened applesauce
1 tbsp vanilla extract
1 1/2 cup sugar
3 cups flour (I prefer a mix of half whole wheat and half unbleached white flour)
1 1/2 tsp baking powder
1 tsp baking soda
1/2 tsp salt
1 tsp cinnamon (or to taste)
1 1/2 cup mashed banana (about 3 medium bananas)
2 medium apples, grated
3 medium carrots, grated

Directions:
Preheat the oven to 350 degrees. Combine all ingredients in a bowl and mix well. If the mixture is too “dry”, feel free to add some unsweetened applesauce until it becomes “batter-like”.

Carefully spoon the batter into the loaf pans, until about 2/3 full but no more than 3/4 full.

Bake until a toothpick inserted in the middle comes out almost clean. To be safe, I checked at the 20 minute mark, then at 5-10 minute intervals until done.

Additional Notes:
The bread did come out a bit “sticky” on top, but that can be attributed to the vegan nature of the recipe. Stickiness aside, the bread was a success as all six loaves were swapped rather quickly.